Water Heater Leaking from the Top: Troubleshooting and Solutions
Panic may be the first emotion you feel the moment you realize you have a water heater leaking from the top, but the good news is that this type of leak is often fixable with the right troubleshooting steps. Unlike leaks at the bottom, which may indicate serious tank damage, top leaks are usually caused by loose connections, a faulty valve, or even excess condensation. Granted, while some issues can be resolved with minor adjustments, others may require professional repair or replacement.
In this post, we’ll help you figure out which situation you have on your hands! Addressing a leak promptly is crucial to prevent water damage, reduce energy waste, and extend the life of your water heater. Let’s walk through the most common causes of a water heater leaking from the top, how to troubleshoot the problem, and the best solutions to get your system back in working order!
Common Causes of a Water Heater Leaking from the Top
If you have a water heater leaking from the top, it can be helpful to troubleshoot a few things. Regular maintenance may help prevent this in the future. Some leaks can be resolved with simple adjustments, while others may require replacing a faulty component. Follow this troubleshooting guide to locate the problem and determine the best solution.
1. Turn Off the Power and Water Supply
Before inspecting your water heater, ensure safety by shutting off the power supply. For electric water heaters, switch off the circuit breaker that powers the unit. For gas water heaters, turn the gas supply valve to the “off” position. Next, close the cold water shut-off valve located near the top of the heater to prevent further water flow.
2. Dry the Area and Identify the Source of the Leak
Use a dry towel to wipe any water pooled around the top of the unit. Once the area is dry, observe carefully to see where new water begins to appear. Since water can travel along pipes before dripping down, inspect all fittings, valves, and ports at the top of the heater to locate the precise point of leakage.
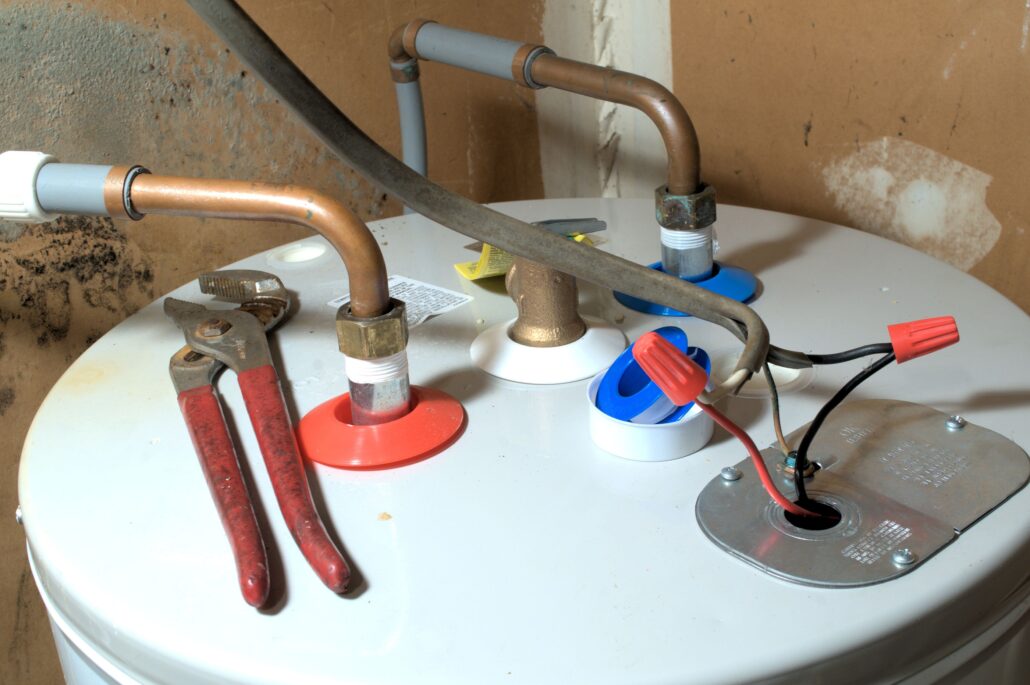
3. Check and Tighten Pipe Connections
If the leak appears to be coming from the cold water inlet or hot water outlet pipes, the connections may have loosened over time. Using a pipe wrench, gently tighten the fittings to ensure a secure seal. Be careful not to over tighten, as this could damage the pipes or fittings. If the connections are visibly corroded, they may need to be replaced to stop the leak.
4. Inspect the Temperature & Pressure Relief (T&P) Valve
A leaking T&P valve can indicate either a faulty valve or excessive pressure inside the tank. First, check the valve connection at the top of the heater. If water is seeping from the fitting, turn off the water supply, remove the valve, and wrap the threads with plumber’s tape before reinstalling it. If the valve continues to leak after resealing, it may need to be replaced. If water is actively spraying or flowing from the valve, this could indicate dangerously high pressure inside the tank, requiring professional assistance.
5. Examine the Anode Rod Port
If the anode rod is not properly sealed or has corroded, it may be the source of the leak. Locate the anode rod’s hexagonal cap at the top of the tank and check for signs of water seepage. If a leak is present, remove the rod, apply plumber’s tape to the threads, and reinstall it securely. If the rod itself is heavily corroded, replacing it with a new one can help prevent further issues.
6. Determine If Condensation Is the Cause
In humid environments or during seasonal changes, condensation may form on the outside of the tank, especially when cold water enters a hot system. To check if condensation is causing the moisture buildup, dry the surface of the heater and monitor it for 30–60 minutes. If no additional water appears, the issue is likely condensation rather than a leak. Improving ventilation and insulating the pipes can help minimize moisture buildup.
7. Restore Power and Water Supply and Monitor for Leaks
Once all necessary adjustments or repairs have been made, reopen the cold water supply valve and restore power to the unit. Observe the top of the heater for any signs of continued leakage. If the leak persists despite these troubleshooting steps, a more serious issue may be present, requiring professional inspection.
When to Call a Professional Plumber
While sometime having a water heater leaking from the top can be fixed with simple troubleshooting, other times it indicates more serious issues that require professional attention. If you’ve checked and tightened pipe connections, replaced faulty components, and ruled out condensation, but the leak persists, it may be time to call a plumber. Signs that professional repair is necessary include excessive corrosion around fittings, continuous leaks from the temperature and pressure relief (T&P) valve, or low water pressure affecting your entire plumbing system. Additionally, if your water heater is over 10–15 years old, a persistent leak may be a sign that it’s nearing the end of its lifespan and needs to be replaced.
Ignoring a water heater leaking from the top can be tempting. Especially, if it’s a small leak but it can lead to water damage, higher utility bills, and potential system failure. If you’re dealing with a water heater leaking from the top and need expert help, Palo Alto Plumbing, Heating, and Air is here to assist. Our licensed professionals can quickly diagnose the issue, perform necessary repairs, and recommend the best solution to keep your home’s hot water supply running smoothly. Contact us today to schedule an inspection and ensure your water heater is operating safely and efficiently!


